Quantcast
Channel: BoostSolutions » SharePoint 2013 tutorial
Viewing all 16 articles
Browse latest View live

How to configure service account in SharePoint 2013

$
0
0

We know in SharePoint all web applications and Windows Services need one managed account, or it cannot be running successfully.
Then how to configure service account in SharePoint 2013? The following will teach you step by step.
Assume that for some reasons you have to change the current service account to another for Web Application Pool – SharePoint – 80.

  • First, you need to register the managed account that you want to change.

Open Central Administration, click Security tab on the left.

Sharepoint Configure Managed Accounts


  • Click Configure Managed Accounts, enter Managed Account page.

Sharepoint Managed Account page

  • Click Register Managed Account.

Sharepoint Register Managed Account

  • Enter the User name and Password, click OK and the managed account is registered successfully.

Notes: You need to use NetBIOS name “br” for User name not the fully qualified domain name”br.local”. Or you will see the error message “Specified value is not supported for the domain Name parameter.” In SharePoint 2010, the message is less clear as “Specified value is not supported for the {0} parameter.”
Now let’s specify the service account for the 80 port.

  • In Security group, click Configure service accounts.

Sharepoint Configure service accounts

  • Click OK. It’s configured successfully!

You can check it in IIS.

Sharepoint Application Pools

  • Finally, you can access one site collection of this web application to make sure it’s OK.

In addition, you can directly change the password of service account.

change the password of service account

We always encounter with such problem that we cannot connect to database when access one site collection. Sometimes the reason is just that the password is changed in Active Directory or it has expired. So you can conveniently tackle this problem by changing password just here.

The post How to configure service account in SharePoint 2013 appeared first on BoostSolutions.


SharePoint 2013 App Tutorial (Basic)

$
0
0

Why use apps in SharePoint 2013?

Isolation prevents unauthorized access to users’ data. The isolation level determines the limit to potential breaches in security. By default, apps are deployed to their own web site in a special, isolated domain, rather than to your farm or a sandbox. Processes run in that domain.

SharePoint 2013 App2

Apps for SharePoint can be hosted by a provider, auto hosted by Windows Azure, hosted by SharePoint or a combination of these three. All of these can leverage SharePoint components. Custom code can only be run in provider-hosted or Windows Azure auto hosted options.

Install and update the App

SharePoint 2013 App

  1. A user finds an app in the SharePoint Store or App Catalog.The App Catalog can be created in Central Administration.
  2. A user can add an app to his or her site. Other users can also do the same.
  3. The app developer releases an update to an app in the SharePoint Store or App Catalog.
  4. Users are notified of an update and decide whether to upgrade the app on their sites.

Uninstall and remove the App

  1. A user decides not to continue using the app and uninstalls it. The app instance and all data are deleted.
  2. SharePoint Store administrators discover an issue with the app and want to remove it.
  3. Store administrators disable and remove the app. Data from the app is retained for recovery purposes.

Reference: Microsoft

The post SharePoint 2013 App Tutorial (Basic) appeared first on BoostSolutions.

How to install a farm solution, in 2010 and 2013 mode, for SharePoint 2013

$
0
0

sharepoint farm solution

The SharePoint 2013 Upgrade Model allows administrators to create true “SharePoint 2010 sites” instead of Visual Upgrade sites. This method is fundamentally different from Visual Upgrade in that there is actually a “14″ root folder that is deployed and all SharePoint 2010 features and files are also deployed.

SharePoint 2013 allows you to run your sites in 2010 and 2013 mode with different functionalities and features. When creating new sites, you can choose which version you would like to use: 2010 or 2013. SharePoint 2013 introduces a new concept called Compatibility Level. Right now the Compatibility Level value is either 14 or 15. When deploying this solution from SharePoint 2010, just deploy them in the old way by using Add-SPSolution and Install-SPSolution as you did in SharePoint 2010. In this way the solutions will be deployed within the 2010 mode. If the Compatibility Level is not specified in the PowerShell command, then the value of the “SharePointProductVersion” attributed in the manifest file of the solution will be used as the Compatibility Level. With the “CompatibilityLevel” parameter in the Install-Solution command you can deploy the solution to either 2010 mode, 2013 mode or both.

Example
Install-SPSolution -Identity [SolutionName].wsp -GACDeployment -CompatibilityLevel 15
Install-SPSolution -Identity [SolutionName].wsp -GACDeployment -CompatibilityLevel {14, 15}

How to install a farm solution in 2010 and 2013 mode programmatically

By using the .Net Reflector, I found an internal method SPSolutionLanguagePack.CreateSolutionDeployTimerJob that can help us to work it out. See the following code snippet.

public void Deploy (Guid solutionId, Collection applications, int maxCompat)
{
    SPSolution solution = SPFarm.Local.Solutions[solutionId];
    SPSolutionLanguagePack languagePack = solution.GetLanguagePack(0);
    SPCompatibilityRange compatibilityRange = new SPCompatibilityRange(14, maxCompat);
    Type deployType = languagePack.GetType();
    Type[] argumentTypes = new Type[] { typeof(DateTime), applications.GetType(), typeof(SPSolutionDeploymentJobType), typeof(bool), typeof(bool), typeof(bool), compatibilityRange.GetType() };
    ParameterModifier[] modifiers = new ParameterModifier[] { new ParameterModifier(7) };
    MethodInfo deployMethod = deployType.GetMethod("CreateSolutionDeployTimerJob", BindingFlags.Instance | BindingFlags.NonPublic, null, argumentTypes, modifiers);
    object[] args = new object[] { GetImmediateJobTime(), applications, SPSolutionDeploymentJobType.Deploy, true, true, false, compatibilityRange };
    deployMethod.Invoke(languagePack, args);
}

Reference
http://technet.microsoft.com/en-us/library/ff607534.aspx
http://technet.microsoft.com/en-us/library/ee617150.aspx

The post How to install a farm solution, in 2010 and 2013 mode, for SharePoint 2013 appeared first on BoostSolutions.

How to integrate multiple SharePoint lists into one list

$
0
0

Having trouble integrating data from multiple SharePoint lists? SharePoint Data Connector, by BoostSolutions, will help you complete your tasks quickly and efficiently.

The following scenario will help you to understand how Data Connector, as a lightweight out-of-the-box data transfer tool, combines data from multiple SharePoint lists.

Assume that you have the following business requirements when using SharePoint:

  • You have a list for the project team members, which contain all the projects information
  • A second list, for the finance, contains the budget and actual costs of the projects
  • You would like the data in the two lists to be integrated into one list, as a project overview, for your general manager
  • You want the data in the project overview list to be updated automatically by schedule

Data Connector will fulfill your requirements and here is how it works.

1. The following are the two lists you want to combine

The Project Info list:

integrate-multiple-sharepoint-lists1

The Project Cost list:

integrate-multiple-sharepoint-lists2

2. You need to create an empty list named Project Overview. This list will be used to receive data from the above mentioned two lists. The column name and type in this list should be the same with the other two lists

integrate-multiple-sharepoint-lists3

3. In the Project Overview list, click the List tab on the Ribbon and then click List Settings
4. In the List Settings page, click the Data Connector Settings under the General Settings section

integrate-multiple-sharepoint-lists4

5. We will need to create two jobs on the Data Connector Job Center page

One job is used to connect data from the Project Info list and the other is used to connect data from the Project Cost list.

6. Click Create Job on the Data Connector Job Center page
7. In the General Settings tab:

  • Type the name that you want for the job in the Job Name sectionintegrate-multiple-sharepoint-lists5
  • In the Direction section, select From external data to listintegrate-multiple-sharepoint-lists6
  • In the List section, the Project Overview list has been selected by defaultintegrate-multiple-sharepoint-lists7
  • Since the Project Info list is in the same SharePoint site collection, select SharePoint 2010 as the External Data Type
  • Enter the URL of the Project Info list
  • Enter the name and password of the user who has Contribute permission to the Project Info list. And then click connectintegrate-multiple-sharepoint-lists8
  • By default, the columns with the same name and type will be automatically mapped. And you can specify the Project Number as the key column to uniquely identify itemsintegrate-multiple-sharepoint-lists9
  • Then specify the Run Optionsintegrate-multiple-sharepoint-lists10


8. In the Schedule Tab,

In order to ensure the job updates automatically, you should enable background update, and set the Schedule as every day at 9:00 AM.

integrate-multiple-sharepoint-lists11

9. In the Notification tab, select Send Notification email when an error occurs and enable logging to monitor the running process of the job

integrate-multiple-sharepoint-lists12

10. Click Save on the top or bottom of the page, and you will return to the Data Connector Job Center page
11. Create another job named Project Cost to Overview in the same way

integrate-multiple-sharepoint-lists13

12. Then, run the two jobs in the Data Connector Job Center page by clicking Runintegrate-multiple-sharepoint-lists14

13. After running the two jobs, enter the Project Overview list, and you will find the list that you want. The two lists have been successfully integrated into one

integrate-multiple-sharepoint-lists16

The post How to integrate multiple SharePoint lists into one list appeared first on BoostSolutions.

Comparison of SharePoint 2013 versions

$
0
0

Before one decides if they should deploy SharePoint, it would be nice to see what options you have in terms of version and some basic costs. For most people monetary cost is a large factor in deploying SharePoint. In fact it could be the deal breaker when deciding whether to purchase and deploy SharePoint. Although SharePoint 2013 Standard and Enterprise can still be prohibitively expensive, from a software, licensing and hardware standpoint; SharePoint Online can be a more palatable alternative on the climb up to hosting SharePoint on your own servers and SharePoint Foundation a cheaper basic version when one has their own servers. Below I have recreated the chart from Microsoft’s website and other sites (see resource list below).

compare


I have not include the cost of the different versions of standalone SharePoint as there are a number of factors that can raise or lower the price of SharePoint. Instead, I suggest you visit Microsoft License Advisor to get a quote for the configuration of the SharePoint you want to set up. For SharePoint Online, Plan 1 costs $3 (US)/month/user and Plan 2 costs $7 (US)/month/user.

Resources:
http://office.microsoft.com/en-us/sharepoint/collaboration-tools-compare-sharepoint-plans-FX103789400.aspx
http://www.khamis.net/blog/Lists/Posts/Post.aspx?List=6c8a23d1-47ea-47e5-b56f-2bc57cb95b93&ID=96&Web=d64cd8b3-a3f4-40d8-8d93-6aa6dc82fcda
http://blog.blksthl.com/2013/01/14/sharepoint-2013-feature-comparison-chart-all-editions/
http://blog.sharepointedutech.com/2013/01/06/sharepoint-2013-version-comparison-chart/
http://www.scribd.com/doc/130865150/SharePoint-2013-Comparison-Chart
http://office.microsoft.com/en-us/sharepoint/sharepoint-products-and-free-trial-online-collaboration-tools-FX103789417.aspx?WT%2Eintid1=ODC_ENUS_FX103479517_XT103977432&WT%2Eintid2=ODC_ENUS_FX103789323_XT103977432

Please email us if you have any comments or questions: inquiry@boostsolutions.com.


The post Comparison of SharePoint 2013 versions appeared first on BoostSolutions.

How to add Sign in as Different User in SharePoint 2013

$
0
0

Hi, guys, maybe you want to sign as another user to test, in Sharepoint 2007 and Sharepint 2010 we can do this easily, however, Sign as Different User interface is hidden by default in SharePoint ?2013. Next, I will introduce one way to show Sign as Different User interface.
First, enter following path:

C:\Program Files\Common Files\Microsoft Shared\Web Server Extensions\15\TEMPLATE\CONTROLTEMPLATES

Then, find the file “Welcome.ascx”
At last, add following XML node after the XML node which id=”ID_RequestAccess”

Text="<%$Resources:wss,personalactions_loginasdifferentuser%>"
Description="<%$Resources:wss,personalactions_loginasdifferentuserdescription%>"
MenuGroupId="100"
Sequence="100" UseShortId="true" />

Just like following picture display

Show Sign as Different User in SharePoint2013

Now, return you site and refresh the page, click people dropdown control, you will see Sign as Different User interface same as following picture

Show Sign as Different User in SharePoint2013_2

The post How to add Sign in as Different User in SharePoint 2013 appeared first on BoostSolutions.

Introduction to SharePoint 2013 JavaScript Object Model

$
0
0

SharePoint 2013 Client Object Model is a set of libraries and classes with which you can consume SharePoint data through a specific object model that is a subset of the SharePoint Server Object Model.

This figure shows the overall architecture of the Client Object Model.

SharePoint2013-JSOM-1

Object Model supports multiple platforms. In fact, you can use it on any solution that can run JavaScript code or in any .NET-managed application, even in a Silverlight solution. Behind the scenes, all these platforms consume a WCF service called Client.svc, which is published under the /_vti_bin/ folder of the current site.

Next let’s talk about JSOM.

JSOM or JavaScript Object Model is a set of .js files built for ECMAScript-enabled platforms. The main .js files that are available are:

  • SP.js
  • SP.Core.js
  • SP.Ribbon.js
  • SP.Runtime.js

These files are deployed in the SharePoint15_Root\TEMPLATE\LAYOUTS directory. The default master pages of SharePoint define a ScriptManager control, which automatically includes references to these .js files. You could also reference them by yourself.

For Security reasons, if you use the Client Object Model within a custom ASPX page, you will need to include the FormDegist control by yourself.

Next let us look at an example as an introduction on how to use JSOM.

SharePoint2013-JSOM-2
In order to retrieve a List instance and show its Title property, first you should reference the SP.js file. You can use the SharePoint:ScriptLink control to reference .js files. SharePoint:ScriptLink control accepts a set of arguments, including the following:

  • LoadAfterUI – Loads the script after the code of the UI
  • Localizable – Indicates if the current page can be localized
  • Name – Defines the relative path of the .js file to include in the page

Next you need to define a script block that uses the object model.

The core of the block is in the method retrieveContacts. In this method, we get a reference to an SP.ClientContext instance by using the get_current() method. We can also get it by using a constructor that accepts the server-relative URL of the target site. Then we can get the current site and get the target list by the current site. Finally, use the asynchronous pattern when executing the query against the SharePoint server.

For learning more about JSOM, please reference:

http://msdn.microsoft.com/zh-cn/library/hh372944(v=office.14).aspx

The post Introduction to SharePoint 2013 JavaScript Object Model appeared first on BoostSolutions.

How to create site collections and webs in SharePoint 2013 with PowerShell

$
0
0

PowerShell is one kind of script language which is based on .NetFramwork and is used for automatic management. For any operation completed within the UI in the SharePoint platform; you can also use SharePoint PowerShell to do the same thing. Not only can this improve work efficiency, but also helps you to further your knowledge about SharePoint. In this blog I will introduce how to create some SharePoint objects using PowerShell. Note that you will not only create these objects, but also use this as an opportunity to learn SharePoint cmdlet.

Generally, we know SharePoint nouns such as web application, site collection, sub site, list, etc. We can use these nouns as part of a command; just add “sp” and the noun, it should look like this: spwebapplication, spsite, etc. You can then further add some verbs to these noun parts of a command, such as new, set, get, remove, etc., to start forming commands.

Now let’s try creating one site collection.

Let’s assume you know the noun, but you do not known the correct command. You can get it with this command.

spsite -?

When you enter this command you will get all the commands that include spsite, like this:

create-site-collections-1

Let’s assume that you now know which command to use, but still do not know the specific parameters. You can use the

New-SPSite -?

command to get further information about the specific parameters, like this:

create-site-collections-2

If you want to see a more detailed example of the entire command, then use the

get-help new-spsite -examples

command, like this:

create-site-collections-3

We will use the second example,

New-SPSite http://farm05:9999/sites/testing

-OwnerAlias "farm05\spfarm05" -Name "Testing" -Template "STS#1"

After executing this command, one site collection will be created and the web template will be Team Site. You can get all the web templates with the Get-SPWebTemplate command.

I will not introduce other objects, but will assume that you understand the basic idea of how to create them, even if you are a newbie.

The last thing I will introduce is how to batch create test data, such as different lists in one team site.

You can do this with a loop. First you can get the count of different list templates and think about the value of the list name. Here we will use the template’s name as the list name; this way you will know every list’s template clearly after you create them. With the index, you can get a list template. Finally you will need to use the following statement:

$listcount=$web.ListTemplates.count

for($x=0;$X -lt $listcount;$x++)

{

$listname=$web.ListTemplates[$x].name

$web.lists.add("$listname","created by powershell",$web.listtemplates[$X]

}

By default, this will not display the list on quick launch.

But if you modify one property of all the lists in one loop, you will be able to complete it.

$lists=$web.Lists

$lists |foreach-object

{

$_.OnQuickLaunch="True"

$_.update()

}

After executing the above command, you can access this web to check the created lists, as shown in this screenshot:

create-site-collections-4

Now you too can create great things using SharePoint PowerShell.

The post How to create site collections and webs in SharePoint 2013 with PowerShell appeared first on BoostSolutions.


How to Create a Cascading Drop-Down List in SharePoint 2013

$
0
0

Today I am going to show you how to create a cascading drop down list in SharePoint 2013. As we know, SharePoint has provided the capability to implement a cascading drop down list for forms out-of-the–box and it’s just a matter of configuration. You can follow the instructions in the article Implement Cascading Drop Down for Forms in SharePoint.

After reading the article, you will realize that you have to customize your forms using Microsoft InfoPath. But the way it was introduced in the article makes it seem like you cannot apply it to a document library. Fortunately, you have another great way to create a cascading drop down list — BoostSolutions Cascading Lookup column. This software allows you to create cascading drop down lists the same way you deal with the lookup columns in out-of-the-box SharePoint, with no code and no InfoPath forms. You can download the BoostSolutions Cascading Lookup column for a 30-day free trial here: BoostSolutions Cascading Lookup column download.

BoostSolutions Cascading Lookup is compatible with SharePoint 2007, SharePoint 2010 and SharePoint 2013. It offers a lot of great features:

  1. Set composed filters on the source list to filter items in the lookup field.
  2. Cross Site Lookup — It allows you retrieve information from any site in the site collection.
  3. Autocomplete — Enables users to quickly find and select item from the drop down list as values are typed, leveraging both searching and filtering.
  4. Multiple parent-child relationship — No limitation on number of cascading levels.
  5. Conversion between SharePoint Lookup column and Cascading Lookup column (settings safety and data safety).

Try it out for yourself.

The post How to Create a Cascading Drop-Down List in SharePoint 2013 appeared first on BoostSolutions.

How to install BoostSolutions Foundation

$
0
0

When you first download and install BoostSolutions products onto your server you must first install BoostSolutions Foundation. This component is essential to managing licenses for BoostSolutions products in a centralized location. Foundation comes prepackaged with BoostSolutions products and will install automatically if you do not already have it on your server. But you also have the option to install it separately before you install any other BoostSolution product. This tutorial we will discuss how to install Foundation onto your server before installing any other product from BoostSolution.


First download and extract the file. Next open the file and double-click on setup.

extract


A foundation installation wizard window will open. Click next to continue.

install 1


The installation wizard will perform a System check to ensure you can install BoostSolutions Foundation. Click next to continue.

install 2


This window shows you the EULA. To continue to the next screen you must accept the terms of the License Agreement. Click next to continue.

install 3


You can select the web application deployment targets. Click next to start the installation.

install 4


BoostSolutions Foundation will start installing.

install 5


The installation is now complete. Click next to see the details of the installation.

install 6


You have now successfully installed Foundation.

install 7


Go to central admin in your SharePoint environment. You will notice the addition of BoostSoutions Software and under that License Management Center. You can click on the License Management Center to manage licenses for BoostSolutions products once you install them. For more information on how to use the License Management Center refer to the tutorial here.

SharePoint 2013 Central Admin

central admin 2013

SharePoint 2010 Central Admin

central admin 2010


Please email us if you have any comments or questions: inquiry@boostsolutions.com.


The post How to install BoostSolutions Foundation appeared first on BoostSolutions.

AD Properties can be mapped to user property

$
0
0

SharePoint administrator can add a new user profile property, which can be mapped to an AD attribute. For example, user profile property “First Name” is mapped to “givenName” in AD which is a “string (Single Value)” type:

1

If you want to add a new user profile, go into the Add User Profile Property page by clicking “New Property” list. A new property type must be specified first:

1

After specifying the property type, the AD attributes will be filtered based on the type. For example, if the “date” type is selected then the AD attributes will show like this:

3

All AD attributes which can be mapped as date will be listed.

AD attributes which can be mapped as a string (Single Value), URL, float, HTML, email Total: 212
aCSPolicyName
adminDescription
adminDisplayName
autoReplyMessage
brandonTestAttibute
c
cn
co
comment
company
department
desktopProfile
displayName
displayNamePrintable
division
dnQualifier
employeeID
employeeNumber
employeeType
extensionAttribute1
extensionAttribute10
extensionAttribute11
extensionAttribute12
extensionAttribute13
extensionAttribute14
extensionAttribute15
extensionAttribute2
extensionAttribute3
extensionAttribute4
extensionAttribute5
extensionAttribute6
extensionAttribute7
extensionAttribute8
extensionAttribute9
facsimileTelephoneNumber
folderPathname
forwardingAddress
gecos
generationQualifier
givenName
homeDirectory
homeDrive
homePhone
homePostalAddress
importedFrom
info
initials
ipPhone
l
language
legacyExchangeDN
loginShell
mail
mailNickname
middleName
mobile
msDS-LastKnownRDN
msDS-PhoneticCompanyName
msDS-PhoneticDepartment
msDS-PhoneticDisplayName
msDS-PhoneticFirstName
msDS-PhoneticLastName
msDS-PrincipalName
msDS-SourceObjectDN
msExchArchiveAddress
msExchArchiveRelease
msExchAssistantName
msExchConfigurationXML
msExchDefaultPublicFolderMailbox
msExchDirsyncID
msExchDirsyncSourceObjectClass
msExchExpansionServerName
msExchExtensionAttribute16
msExchExtensionAttribute17
msExchExtensionAttribute18
msExchExtensionAttribute19
msExchExtensionAttribute20
msExchExtensionAttribute21
msExchExtensionAttribute22
msExchExtensionAttribute23
msExchExtensionAttribute24
msExchExtensionAttribute25
msExchExtensionAttribute26
msExchExtensionAttribute27
msExchExtensionAttribute28
msExchExtensionAttribute29
msExchExtensionAttribute30
msExchExtensionAttribute31
msExchExtensionAttribute32
msExchExtensionAttribute33
msExchExtensionAttribute34
msExchExtensionAttribute35
msExchExtensionAttribute36
msExchExtensionAttribute37
msExchExtensionAttribute38
msExchExtensionAttribute39
msExchExtensionAttribute40
msExchExtensionAttribute41
msExchExtensionAttribute42
msExchExtensionAttribute43
msExchExtensionAttribute44
msExchExtensionAttribute45
msExchExternalDirectoryObjectId
msExchExternalSyncState
msExchFBURL
msExchGenericForwardingAddress
msExchHomeServerName
msExchHouseIdentifier
msExchIMAddress
msExchIMAPOWAURLPrefixOverride
msExchIMMetaPhysicalURL
msExchImmutableId
msExchIMPhysicalURL
msExchLicenseToken
msExchLitigationHoldOwner
msExchMailboxMoveBatchName
msExchMailboxMoveRemoteHostName
msExchMailboxPlanType
msExchMailboxRelease
msExchMailboxUrl
msExchPartnerGroupID
msExchPfRootUrl
msExchPublicFolderSmtpAddress
msExchResourceDisplay
msExchRetentionComment
msExchRetentionURL
msExchShadowAssistantName
msExchShadowC
msExchShadowCo
msExchShadowCompany
msExchShadowDepartment
msExchShadowDisplayName
msExchShadowFacsimileTelephoneNumber
msExchShadowGivenName
msExchShadowHomePhone
msExchShadowInfo
msExchShadowInitials
msExchShadowL
msExchShadowMailNickname
msExchShadowMobile
msExchShadowPager
msExchShadowPhysicalDeliveryOfficeName
msExchShadowPostalCode
msExchShadowSn
msExchShadowSt
msExchShadowStreetAddress
msExchShadowTelephoneAssistant
msExchShadowTelephoneNumber
msExchShadowTitle
msExchShadowWindowsLiveID
msExchShadowWWWHomePage
msExchTeamMailboxSharePointUrl
msExchUMFaxId
msExchUMOperatorNumber
msExchUMPhoneProvider
msExchUsageLocation
msExchUserCulture
msExchVoiceMailboxID
msExchWindowsLiveID
msIIS-FTPDir
msIIS-FTPRoot
msRADIUSCallbackNumber
msRADIUS-FramedInterfaceId
msRADIUS-FramedIpv6Prefix
msRADIUS-SavedFramedInterfaceId
msRADIUS-SavedFramedIpv6Prefix
msRASSavedCallbackNumber
msSFU30Name
msSFU30NisDomain
msTSHomeDirectory
msTSHomeDrive
msTSInitialProgram
msTSLicenseVersion
msTSLicenseVersion2
msTSLicenseVersion3
msTSLicenseVersion4
msTSManagingLS
msTSManagingLS2
msTSManagingLS3
msTSManagingLS4
msTSProfilePath
msTSWorkDirectory
name
pager
personalPager
personalTitle
physicalDeliveryOfficeName
pOPCharacterSet
pOPContentFormat
postalCode
preferredLanguage
primaryInternationalISDNNumber
primaryTelexNumber
profilePath
sAMAccountName
scriptPath
sn
st
street
streetAddress
targetAddress
telephoneAssistant
telephoneNumber
textEncodedORAddress
title
unicodePwd
unixHomeDirectory
userParameters
userPrincipalName
userSharedFolder
userWorkstations
wWWHomePage


AD attributes which can be mapped as a string (Multi Value) Total:91
accountNameHistory
altSecurityIdentities
businessCategory
carLicense
departmentNumber
description
destinationIndicator
extensionName
groupPriority
groupsToIgnore
houseIdentifier
internationalISDNNumber
labeledURI
mhsORAddress
msDS-AllowedToDelegateTo
msExchADCGlobalNames
msExchAggregationSubscriptionCredential
msExchAlternateMailboxes
msExchArchiveName
msExchCustomProxyAddresses
msExchDirsyncAuthorityMetadata
msExchDirsyncStatusAck
msExchEdgeSyncCookies
msExchEwsExceptions
msExchEwsWellKnownApplicationPolicies
msExchExtensionCustomAttribute1
msExchExtensionCustomAttribute2
msExchExtensionCustomAttribute3
msExchExtensionCustomAttribute4
msExchExtensionCustomAttribute5
msExchLabeledURI
msExchMobileAllowedDeviceIDs
msExchMobileBlockedDeviceIDs
msExchObjectCountQuota
msExchOmaAdminExtendedSettings
msExchOriginatingForest
msExchPoliciesExcluded
msExchPoliciesIncluded
msExchProxyCustomProxy
msExchRecipientValidatorCookies
msExchResourceGUID
msExchResourceMetaData
msExchResourceProperties
msExchResourceSearchProperties
msExchSendAsAddresses
msExchSenderHintTranslations
msExchShadowOtherFacsimileTelephone
msExchShadowOtherHomePhone
msExchShadowOtherTelephone
msExchShadowProxyAddresses
msExchSharingAnonymousIdentities
msExchSharingPartnerIdentities
msExchSignupAddresses
msExchUCVoiceMailSettings
msExchUMAddresses
msExchUMCallingLineIDs
msExchUMDtmfMap
msExchUserHoldPolicies
msNPCallingStationID
msNPSavedCallingStationID
msRADIUS-FramedIpv6Route
msRADIUSFramedRoute
msRADIUS-SavedFramedIpv6Route
msRASSavedFramedRoute
msTSLSProperty01
msTSLSProperty02
msTSProperty01
msTSProperty02
networkAddress
o
otherFacsimileTelephoneNumber
otherHomePhone
otherIpPhone
otherLoginWorkstations
otherMailbox
otherMobile
otherPager
otherTelephone
ou
postalAddress
postOfficeBox
protocolSettings
proxyAddresses
roomNumber
serialNumber
servicePrincipalName
uid
url
userSharedFolderOther
wbemPath
x121Address


AD attributes which can be mapped as an integer, time zone Total:124
adminCount
codePage
countryCode
deletedItemFlags
delivContLength
deliveryMechanism
dLMemDefault
enabledProtocols
flags
garbageCollPeriod
gidNumber
heuristics
instanceType
internetEncoding
languageCode
mDBOverHardQuotaLimit
mDBOverQuotaLimit
mDBStorageQuota
mS-DS-ConsistencyChildCount
msDS-FailedInteractiveLogonCount
msDS-FailedInteractiveLogonCountAtLastSuccessfulLogon
msDS-HABSeniorityIndex
msDS-NcType
msDS-SecondaryKrbTgtNumber
msDS-SupportedEncryptionTypes
msExchAddressBookFlags
msExchALObjectVersion
msExchArchiveStatus
msExchAuditAdmin
msExchAuditDelegate
msExchAuditDelegateAdmin
msExchAuditOwner
msExchCalendarLoggingQuota
msExchContentConversionSettings
msExchDumpsterQuota
msExchDumpsterWarningQuota
msExchEdgeSyncConfigFlags
msExchEdgeSyncRetryCount
msExchELCMailboxFlags
msExchEwsApplicationAccessPolicy
msExchEwsEnabled
msExchExternalOOFOptions
msExchForestModeFlag
msExchGroupExternalMemberCount
msExchGroupMemberCount
msExchIMAP4Settings
msExchInconsistentState
msExchLocalizationFlags
msExchMailboxAuditLogAgeLimit
msExchMailboxFolderSet
msExchMailboxFolderSet2
msExchMailboxMoveFlags
msExchMailboxMoveStatus
msExchManagementSettings
msExchMaxBlockedSenders
msExchMaxSafeSenders
msExchMDBRulesQuota
msExchMessageHygieneFlags
msExchMessageHygieneSCLDeleteThreshold
msExchMessageHygieneSCLJunkThreshold
msExchMessageHygieneSCLQuarantineThreshold
msExchMessageHygieneSCLRejectThreshold
msExchMobileDebugLogging
msExchMobileMailboxFlags
msExchMobileSettings
msExchModerationFlags
msExchOmaAdminWirelessEnable
msExchOrganizationUpgradeRequest
msExchOrganizationUpgradeStatus
msExchOWASettings
msExchPOP3Settings
msExchProvisioningFlags
msExchRecipientDisplayType
msExchRecipientSoftDeletedStatus
msExchRecipLimit
msExchResourceCapacity
msExchRoleGroupType
msExchSetupStatus
msExchShadowCountryCode
msExchTransportInboundSettings
msExchTransportOutboundSettings
msExchTransportRecipientSettingsFlags
msExchTUISpeed
msExchTUIVolume
msExchUMAudioCodec
msExchUMAudioCodec2
msExchUMEnabledFlags
msExchUMEnabledFlags2
msExchUMListInDirectorySearch
msExchUMMailboxOVALanguage
msExchUMMaxGreetingDuration
msExchUMServerWritableFlags
msExchUserAccountControl
msRADIUSFramedIPAddress
msRADIUSServiceType
msRASSavedFramedIPAddress
msTSMaxConnectionTime
msTSMaxDisconnectionTime
msTSMaxIdleTime
msTSRemoteControl
objectVersion
operatorCount
primaryGroupID
replicatedObjectVersion
replicationSensitivity
revision
rid
sAMAccountType
shadowExpire
shadowFlag
shadowInactive
shadowLastChange
shadowMax
shadowMin
shadowWarning
submissionContLength
systemFlags
uidNumber
userAccountControl
USNIntersite
versionNumber


AD attributes which can be mapped as Unique Identifier, binary Total:54
businessRoles
dBCSPwd
dSASignature
formData
groupMembershipSAM
logonHours
logonWorkstation
msDS-Cached-Membership
mS-DS-ConsistencyGuid
mS-DS-CreatorSID
msExchArchiveDatabaseLinkSL
msExchArchiveGUID
msExchBlockedSendersHash
msExchCanaryData0
msExchCanaryData1
msExchCanaryData2
msExchCorrelationId
msExchDisabledArchiveDatabaseLinkSL
msExchDisabledArchiveGUID
msExchEdgeSyncSourceGuid
msExchForeignGroupSID
msExchHomeMDBSL
msExchHomeMTASL
msExchMailboxGuid
msExchMailboxMoveSourceArchiveMDBLinkSL
msExchMailboxMoveSourceMDBLinkSL
msExchMailboxMoveTargetArchiveMDBLinkSL
msExchMailboxMoveTargetMDBLinkSL
msExchMasterAccountSid
msExchObjectID
msExchOnPremiseObjectGuid
msExchPreviousAccountSid
msExchPreviousArchiveDatabaseSL
msExchPreviousHomeMDBSL
msExchPreviousMailboxGuid
msExchSafeRecipientsHash
msExchSafeSendersHash
msExchTUIPassword
msExchUMPinChecksum
msExchUMSpokenName
msExchUnmergedAttsPt
mSMQSignCertificates
mSMQSignCertificatesMig
msPKIRoamingTimeStamp
objectGUID
objectSid
replicationSignature
securityIdentifier
supportedAlgorithms
terminalServer
thumbnailLogo
thumbnailPhoto
unmergedAtts
userCert


AD attributes which can be mapped as Person Total:46
altRecipient
assistant
dynamicLDAPServer
fSMORoleOwner
homeMDB
homeMTA
kMServer
lastKnownParent
manager
msCOM-UserPartitionSetLink
msDS-ResultantPSO
msExchAddressBookPolicyLink
msExchArbitrationMailbox
msExchArchiveDatabaseLink
msExchControllingZone
msExchCU
msExchDisabledArchiveDatabaseLink
msExchHABRootDepartmentLink
msExchIMVirtualServer
msExchIntendedMailboxPlanLink
msExchMailboxMoveSourceArchiveMDBLink
msExchMailboxMoveSourceMDBLink
msExchMailboxMoveTargetArchiveMDBLink
msExchMailboxMoveTargetMDBLink
msExchMailboxTemplateLink
msExchMobileMailboxPolicyLink
msExchOURoot
msExchOWAPolicy
msExchParentPlanLink
msExchPreviousArchiveDatabase
msExchPreviousHomeMDB
msExchPublicFolderMailbox
msExchQueryBaseDN
msExchRBACPolicyLink
msExchServerAssociationLink
msExchShadowManagerLink
msExchSharingPolicyLink
msExchSyncAccountsPolicyDN
msExchTeamMailboxSharePointLinkedBy
msExchThrottlingPolicyDN
msExchUMRecipientDialPlanLink
msExchUMTemplateLink
msExchUseOAB
msTSPrimaryDesktop
objectCategory
preferredOU


AD attributes which can be mapped as date time (date no year, date) Total:22
birthday
createTimeStamp
expirationTime
msDS-LocalEffectiveDeletionTime
msDS-LocalEffectiveRecycleTime
msExchELCExpirySuspensionEnd
msExchELCExpirySuspensionStart
msExchLastExchangeChangedTime
msExchLitigationHoldDate
msExchMailboxAuditLastAdminAccess
msExchMailboxAuditLastDelegateAccess
msExchMailboxAuditLastExternalAccess
msExchShadowWhenSoftDeletedTime
msExchTeamMailboxExpiration
msExchWhenMailboxCreated
msExchWhenSoftDeletedTime
msTSExpireDate
msTSExpireDate2
msTSExpireDate3
msTSExpireDate4
startDate
whenCreated


AD attributes which can be mapped as boolean Total:25
autoReply
deliverAndRedirect
isCriticalSystemObject
isDeleted
isRecycled
mAPIRecipient
mDBUseDefaults
msExchBypassAudit
msExchCalculatedTargetAddress
msExchCalendarRepairDisabled
msExchEnableModeration
msExchHideFromAddressLists
msExchInterruptUserOnAuditFailure
msExchIsMSODirsynced
msExchMailboxAuditEnable
msExchPolicyEnabled
msExchRequireAuthToSendTo
msNPAllowDialin
msTSAllowLogon
msTSBrokenConnectionAction
msTSConnectClientDrives
msTSConnectPrinterDrives
msTSDefaultToMainPrinter
msTSReconnectionAction
showInAdvancedViewOnly


AD attributes which can be mapped as big integer Total:141
accountExpires
adminCount
codePage
countryCode
deletedItemFlags
delivContLength
deliveryMechanism
dLMemDefault
enabledProtocols
flags
garbageCollPeriod
gidNumber
heuristics
instanceType
internetEncoding
languageCode
lastLogonTimestamp
lockoutTime
maxStorage
mDBOverHardQuotaLimit
mDBOverQuotaLimit
mDBStorageQuota
msDS-Cached-Membership-Time-Stamp
mS-DS-ConsistencyChildCount
msDS-FailedInteractiveLogonCount
msDS-FailedInteractiveLogonCountAtLastSuccessfulLogon
msDS-GeoCoordinatesAltitude
msDS-GeoCoordinatesLatitude
msDS-GeoCoordinatesLongitude
msDS-HABSeniorityIndex
msDS-LastFailedInteractiveLogonTime
msDS-LastSuccessfulInteractiveLogonTime
msDS-NcType
msDS-SecondaryKrbTgtNumber
msDS-SupportedEncryptionTypes
msDS-UserPasswordExpiryTimeComputed
msExchAddressBookFlags
msExchALObjectVersion
msExchArchiveQuota
msExchArchiveStatus
msExchArchiveWarnQuota
msExchAuditAdmin
msExchAuditDelegate
msExchAuditDelegateAdmin
msExchAuditOwner
msExchCalendarLoggingQuota
msExchContentConversionSettings
msExchDumpsterQuota
msExchDumpsterWarningQuota
msExchEdgeSyncConfigFlags
msExchEdgeSyncRetryCount
msExchELCMailboxFlags
msExchEwsApplicationAccessPolicy
msExchEwsEnabled
msExchExternalOOFOptions
msExchForestModeFlag
msExchGroupExternalMemberCount
msExchGroupMemberCount
msExchIMAP4Settings
msExchInconsistentState
msExchLocalizationFlags
msExchMailboxAuditLogAgeLimit
msExchMailboxFolderSet
msExchMailboxFolderSet2
msExchMailboxMoveFlags
msExchMailboxMoveStatus
msExchManagementSettings
msExchMaxBlockedSenders
msExchMaxSafeSenders
msExchMDBRulesQuota
msExchMessageHygieneFlags
msExchMessageHygieneSCLDeleteThreshold
msExchMessageHygieneSCLJunkThreshold
msExchMessageHygieneSCLQuarantineThreshold
msExchMessageHygieneSCLRejectThreshold
msExchMobileDebugLogging
msExchMobileMailboxFlags
msExchMobileSettings
msExchModerationFlags
msExchOmaAdminWirelessEnable
msExchOrganizationUpgradeRequest
msExchOrganizationUpgradeStatus
msExchOWASettings
msExchPOP3Settings
msExchPreviousRecipientTypeDetails
msExchProvisioningFlags
msExchRecipientDisplayType
msExchRecipientSoftDeletedStatus
msExchRecipientTypeDetails
msExchRecipLimit
msExchRemoteRecipientType
msExchResourceCapacity
msExchRoleGroupType
msExchSetupStatus
msExchShadowCountryCode
msExchTransportInboundSettings
msExchTransportOutboundSettings
msExchTransportRecipientSettingsFlags
msExchTUISpeed
msExchTUIVolume
msExchUMAudioCodec
msExchUMAudioCodec2
msExchUMEnabledFlags
msExchUMEnabledFlags2
msExchUMListInDirectorySearch
msExchUMMailboxOVALanguage
msExchUMMaxGreetingDuration
msExchUMServerWritableFlags
msExchUserAccountControl
msExchVersion
msRADIUSFramedIPAddress
msRADIUSServiceType
msRASSavedFramedIPAddress
msTSMaxConnectionTime
msTSMaxDisconnectionTime
msTSMaxIdleTime
msTSRemoteControl
objectVersion
operatorCount
primaryGroupID
pwdLastSet
replicatedObjectVersion
replicationSensitivity
revision
rid
sAMAccountType
shadowExpire
shadowFlag
shadowInactive
shadowLastChange
shadowMax
shadowMin
shadowWarning
submissionContLength
systemFlags
uidNumber
userAccountControl
uSNDSALastObjRemoved
USNIntersite
uSNSource
versionNumber

The post AD Properties can be mapped to user property appeared first on BoostSolutions.

What’s new in SharePoint Server 2013 Workflow

$
0
0

SharePoint Server 2013 includes a Workflow Manager (SharePoint 2013 Workflow Platform) feature which introduces new capabilities for authoring, hosting and managing workflows.

Workflow Manager brings a new class of workflow to SharePoint Server 2013. Workflow is built by using Workflow Manager which can take advantage of several new capabilities. These include enterprise features such as:

  • High Density and Multi-Tenancy
  • Elastic Scale
  • Activity / Workflow Artifact Management
  • Tracking and Monitoring
  • Instance Management
  • Fully Declarative Authoring
  • REST and Service Bus Messaging
  • Managed Service Reliability

1

Note: As a SharePoint Server 2013 workflow administrator, you should be familiar with Windows PowerShell. After you have installed the Workflow Manager service, you will need to configure it to communicate with your SharePoint Server 2013 farm. This pairing is accomplished by using Windows PowerShell cmdlets. Windows PowerShell is used exclusively when you manage and monitor Workflow Manager.

You can download the Workflow Manager 1.0 from: http://www.microsoft.com/en-hk/download/details.aspx?id=35375 .

After you install Workflow Manager 1.0, you will find that there is a web site in the IIS Manager which provides the workflow SOA function. The following is the screenshot highlighting the Workflow Management Site:

2

For more information about Workflow Manager 1.0 please see this link: http://technet.microsoft.com/en-us/library/jj193528 .

You can install and configure workflow for SharePoint Server 2013 step by step using the following link:

http://technet.microsoft.com/en-us/library/jj658588.aspx

Reference:

http://technet.microsoft.com/en-us/library/jj219638(office.15)

The post What’s new in SharePoint Server 2013 Workflow appeared first on BoostSolutions.

How get SharePoint user login name in SharePoint 2010/2013

$
0
0

There are a lot of login authentications in SharePoint, different ways of certification for SharePoint user is different, as well as property.

In SharePoint 2010 you can get user login name by using:

public static SPPrincipal EnsurePeople(SPWeb web, string peopleName)
        {
            SPPrincipal principal = GetPeople(web, peopleName);
            if (principal != null)
            {
                return principal;
            }
            else
            {
                try
                {
                    SPUser user = null;
                    SecurityUtility.RunWithSystemAccountPrivileges(web, delegate(SPWeb delegateWeb)
                    {
                        delegateWeb.AllowUnsafeUpdates = true;
                        user = delegateWeb.EnsureUser(peopleName);
                        delegateWeb.AllowUnsafeUpdates = false;
                    });
                    return user;
                }
                catch
                {
                    return null;
                }
            }
        }
		 public static string GetDecodeUserName(string userName)
        {
            if (!string.IsNullOrEmpty(userName))
            {
                SPPrincipal people = PeopleUtility.EnsurePeople(SPContext.Current.Web, userName);
                if (people != null)
                {
                    string loginName = people.LoginName;
                    if (SPClaimProviderManager.IsEncodedClaim(loginName))
                    {
                        SPClaim claim = SPClaimProviderManager.Local.DecodeClaim(loginName);
                        SPOriginalIssuerType issuerType = SPOriginalIssuers.GetIssuerType(claim.OriginalIssuer);
                        switch (issuerType)
                        {
                            case SPOriginalIssuerType.ClaimProvider:
                            case SPOriginalIssuerType.Forms:
                            case SPOriginalIssuerType.SecurityTokenService:
                            case SPOriginalIssuerType.TrustedProvider:
                            case SPOriginalIssuerType.Unknown:
                                userName = SPClaimProviderManager.Local.DecodeClaim(loginName).Value;
                                break;
                            case SPOriginalIssuerType.Windows:
                                userName = SPClaimProviderManager.Local.ConvertClaimToIdentifier(loginName);
                                break;
                            default:
                                break;
                        }
                    }
                    else
                    {
                        userName = people.LoginName;
                    }
                }
            }

            return userName;
        }

In sharepoint 2013 you can get user login name by using:

SPClaimProviderManager claimManager = SPClaimProviderManager.Local;
		SPClaim userClaim = claimManager.ConvertSPUserToClaim(user);
		string loginName = claimManager.ConvertClaimToIdentifier(userClaim.ToEncodedString()); // given a Windows user encoded claim, this method will return a string in the DOMAIN\USERNAME format.

Articles for reference:

How Claims encoding works in SharePoint 2010 – Writen by Wictor Wilen, SharePoint MCA, MCSM, MCM and MVP

SPClaimProviderManager Methods by Microsoft


The post How get SharePoint user login name in SharePoint 2010/2013 appeared first on BoostSolutions.

Introduction of SharePoint 2013 Active Directory Import

$
0
0

SharePoint Active Directory Import (AD Import) is one of the new features in SharePoint 2013. It enables you to import user information from Active Directory into SharePoint User Profile Application.

This article will introduce how to configure SharePoint Active Directory Import in Central Administration, what the limitations of this feature are and how AD Information Sync can overcome these limitations.

I. How to configure SharePoint Active Directory Import

Before we begin, we will assume that you have already provisioned the User Profile Service, have created the User Profile service application and have gathered the required information about your environment.

This section has 4 parts that will help you to configure AD Import:

Introduction of SharePoint Active Directory Import_12

Introduction of SharePoint Active Directory Import_9

Introduction of SharePoint Active Directory Import_6

Introduction of SharePoint Active Directory Import_3

Enable Active Directory Import

  1. Enter SharePoint Central Administration. Under the Application Management section, click Manage service applications.Introduction of SharePoint Active Directory Import_7
  2. On the Manage Service Applications page, click User Profile Service Application.
  3. On the Manage Profile Service page, in the Synchronization section, click Configure Synchronization Settings.
  4. On the Configure Synchronization Settings page, in the Synchronization Options section, select Use SharePoint Active Directory Import option, and click OK.


Configure Synchronization Connections

  1. On the Manage Profile Service page, click Configure Synchronization Connections. You will enter the Synchronization Connections page.
  2. On the Synchronization Connections page, click the Create New Connection button.
  3. On the Add new synchronization connection page, enter the connection name in the Connection Name text box.
  4. From the Type list, select Active Directory Import.
  5. Complete the Connection Settings section using the following steps:
    1. In the Fully Qualified Domain Name box, enter the Fully Qualified Domain Name of the domain.
    2. In the Authentication Provider Type box, select the authentication provider type.
    3. If you select Forms Authentication or Trusted Claims Provider Authentication, select an Authentication provider from the Authentication Provider Instance box. The Authentication Provider Instance box lists only the authentication providers that are currently used by a Web application.
    4. In the Account name box, enter the synchronization account in the form: DOMAIN\user_name. The synchronization account must have Replicate Directory permissions or higher in the root OU of Active Directory.
    5. In the Password box, enter the password for the synchronization account.
    6. In the Confirm password box, enter the password for the synchronization account again.
    7. In the Port box, enter the connection port.
    8. If a Secure Sockets Layer (SSL) connection is required to connect to the directory service, select Use SSL-secured connection.
    9. If you want to filter objects to be imported from the directory service, in the Filter in LDAP syntax for Active Directory Import box, enter a standard LDAP query expression to define the filter.Introduction of SharePoint Active Directory Import_5
  6. In the Containers section, click Populate Containers and then select the containers from the directory service which you want to synchronize. All OUs selected will be synchronized along with their child OUs.
  7. Click OK and a newly created connection will be listed on the Synchronization Connections page.

Map AD attributes with User Profile Properties

  1. On the SharePoint Central Administration website, in the Application Management section, click Manage service applications.
  2. On the Manage Service Applications page, click User Profile Service Application.
  3. On the Manage Profile Service page, in the People section, click Manage User Properties.
  4. On the Manage user Properties page, right-click the name of the property that you want to map a directory service attribute to, and then click Edit.
  5. To remove an existing mapping, in the Property Mapping for Synchronization section, select the mapping that you want to remove, and then click Remove.
  6. To add a new mapping:
    1. In the Add New Mapping section, in the Source Data Connection list, select the data connection that represents the directory service to which you want to map the user profile property to.
    2. In the Attribute box, enter the name of the directory service attribute to which you want to map the property.
    3. Click Add.
  7. Click OK.
  8. Repeat steps 4 through 7 to map additional properties.

Start Synchronization

  1. On the SharePoint Central Administration website, in the Application management section, click Manage service applications.
  2. On the Manage Service Applications page, click User Profile Service Application.
  3. On the Manage Profile Service page, in the Synchronization section, click Start Profile Synchronization.
  4. On the Start Profile Synchronization page, select Start Full Synchronization if this is the first time that you are synchronizing or if you have added or modified any synchronization connections since the last time that you synchronized. Select Start Incremental Synchronization to synchronize only information that has changed since the last time that you synchronized.
  5. Click OK. The Manage Profile Service page will be displayed showing the profile synchronization status in the right pane.

II. Key limitations of SharePoint Active Directory Import

Although this feature can import AD profiles from Active Directory to SharePoint, there are some limitations:

  • It is very complicated to configure the synchronization and it always gets stuck when starting.
  • This feature can only import information to User Profile Application, but cannot import to other lists, such as Contact list.
  • You cannot update your active directory with changes made in SharePoint; there is no “write back” function it only imports.
  • After starting the synchronization, you have no idea if the synchronization is successful and you don’t know what problems, if any, occurred during synchronization.
  • This feature is only supported on SharePoint Server 2013, not on SharePoint Foundation 2013.


III. About AD Information Sync

AD Information Sync is a flexible and powerful tool which syncs information between Active Directory and SharePoint. It supports many AD attributes from User, Contact and Computer objects. AD Information Sync overcomes many of the limitations found in SharePoint Active Directory Import.

  • With AD Information Sync, you can create and configure a sync profile in one place with a simple user interface. It also helps you to get rid of the “stuck when starting” problem.Introduction of SharePoint Active Directory Import_2
  • AD Information Sync allows you to import Users Profiles from Active Directory to any SharePoint list. You can view and manage user profiles in SharePoint list.Introduction of SharePoint Active Directory Import_1
  • AD Information Sync provides you with a powerful attributes mapping function; you can configure attribute mappings in one page quickly and easily.Introduction of SharePoint Active Directory Import_10
  • With AD Information Sync, any modifications made in SharePoint list can be written back to Active Directory. This is easily done with one click; all you need to do is select the option.Introduction of SharePoint Active Directory Import_11
  • With AD Information Sync, you can monitor sync activities by viewing the logs. Logs will quickly let you know what has happened during synchronization.Introduction of SharePoint Active Directory Import_8


The post Introduction of SharePoint 2013 Active Directory Import appeared first on BoostSolutions.

How to keep user information consistent between SharePoint and Active Directory

$
0
0

As we know, a User is created in the User Information List when a user is granted access to a site in SharePoint. But this list is hidden and we are not able to use the data directly. As well there may not be a lot of metadata in this list. Sometimes you may create multiple customer lists to store user information. How do you keep user data from multiple systems (Active directory and SharePoint) consistent? The obvious answer would be for IT administrators to manually update information between systems. But it would be hard, maybe even impossible if there is a lot of information, to keep data up-to-date and consistent. One easy method to ensuring that data is up-to-date and consistent is to use BoostSolutions Active Directory Info Sync and Data Connector.

I will demonstrate a scenario to clarify how to make this method work.

User Data

Data in Active Directory: User (Employee ID, Job Title, Gender, Department, Email, Mobile phone, Employee hiring/start date

Data in SharePoint list:

Employee Base Information in Administrative site: Employee ID (Key), Name, Job Title, Gender, Department, E-Mail, Mobile phone, Employee hiring/start date

Interested Candidates in HR site: Name, Birthday, Interview date, Interview Status, Institution(s) Graduated from, Major, Degree(s)

Employee Record in HR site: Employee ID(Key), Name, Job Title, Department, on board date, Institution(s) Graduate from, Major, Degree(s), Expiration date of Contract


Permissions in SharePoint List:

Employee Basic information is read-only for all Employees

Interested Candidates, Employee Record in HR site; contribute-only for HR employee


The process of hiring a new employee

image1


Transferring User Data

Let us focus on how to keep user information consistent.

The image below highlights how user data is transferred using BoostSolutions Active Directory Info Sync and Data Connector.

image2

You need to:

  • Schedule a job (profile) to ensure data is up-to-date and consistent.
  • Enable logs to check if the data transferred correctly or if there were errors.
  • If there are errors, email the administrator.


Key Configurations

Settings in AD Information Sync:

image3

Settings in Profile:

image4

Key Step:

In the Column Mapping section, you can select which AD attributes you want to transfer into SharePoint. AD information Sync will ensure your data is consistent between AD and SharePoint.

For more detailed information you can refer to the Active Directory Sync Tutorial: http://www.boostsolutions.com/active-directory-sync-tutorial.html


Settings in Data Connector:

image5


Job Settings:

image6

Key Step:

In the Direction section, decide whether list or external data is the source for your data.

In the Column Mapping section, the “key column” is one that uniquely identifies records and can be used to compare two data sources, thus ensuring data consistency. Checking this box means data is automatically synced and updated. You can select multiple columns to make them unique and ensure data consistency.

For more detailed information you can refer to the Data Connector Tutorial: http://www.boostsolutions.com/data-connector.html


Summary

You can expand your data sources based on your business type. Data Connector can connect to multiple external Data Types such as: SQL Server, Oracle and My SQL.

The post How to keep user information consistent between SharePoint and Active Directory appeared first on BoostSolutions.


Outgoing Email Settings in SharePoint 2016

$
0
0

For any messages (such as alerts, notifications and site invitations) to be sent out of SharePoint server, you need to configure SMTP server to send the messages. This server can be any SMTP-compliant server that you can connect to using port 25 from the SharePoint server. For SharePoint 2010/2013, it cannot be configured to send e-mail over encrypted port (such as Office 365 or Gmail). If you want to set outgoing mail settings for non-default port (25), you need to configure SMTP server on your server, and configure SMTP server settings in IIS 6.0 Manager.

Take Gmail as example:

1. Open Server Manager – Features tab, click Add Features. From the Features list, select SMTP Server and click Next button.

2. Follow the wizard, wait for installation complete.

3. And then Open Windows services, make sure that Simple Mail Transfer Protocol (SMTP) service has been started.

4. Open IIS 6.0 Manager, right-click SMTP Server and click Properties.

5. Under General tab, select your local IP address.

6. Under Access tab, click Connection and select All except the list below option. And select All except the list below option for Relay Restrictions.

7. Under Delivery tab, click Outbound Security. And click Basic authentication, enter user name and password. (enter your Gmail account) and enable TLS encryption.

Note that if your Gmail turn on 2-step verification, you need to enter the application specific password here. (https://support.google.com/accounts/answer/185833?hl=en) Follow these steps to generate the application specific password.

a. Click your name or photo near your Gmail inbox’s top right corner. Click Account link.

b. Open the Security tab, and go to the App-specific passwords tab. If prompted for your Gmail password, enter your password over Password and click Sign in.

c. Click Select device and choose the Windows Computer.

d. Click Select app and choose Mail.

e. Select Generate.

f. Copy the App password (the 16 character code in the yellow bar), and click Done.

8. Open Outbound Connections, change the TCP port to 587.

9. Open Advanced Delivery, type smtp.gmail.com in Smart host. And then save the settings.

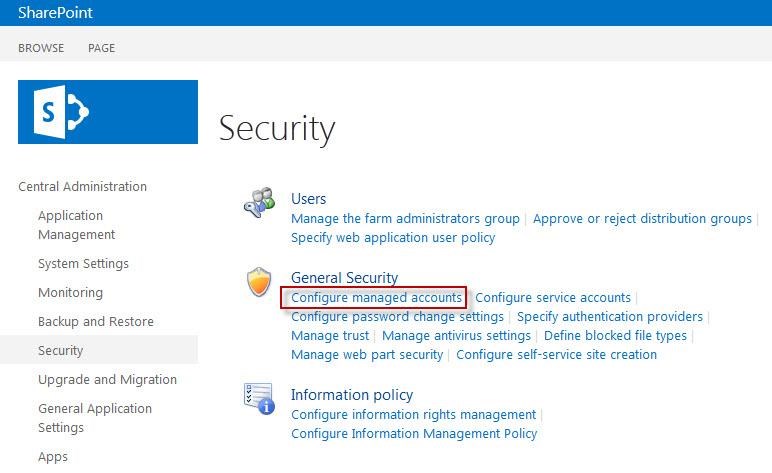
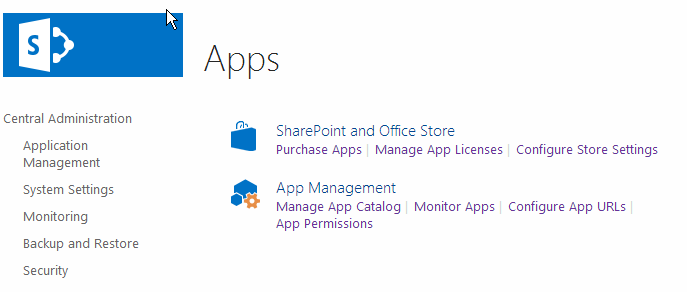
10. Open SharePoint Central Administration, click Configure outgoing e-mail settings in System Settings.

11. In Outbound SMTP server, type your local IP address. In From address, type your Gmail address.

sharepoint2016-outgoing-email-settings

12. Click OK to save the settings.

Fortunately, SharePoint Server 2016 adds support for SMTP servers that use TCP ports other than the default port (25).

Also, SharePoint 2016 supports send email to SMTP servers that use STARTTLS connection encryption. The SMTP server must support the TLS 1.0, TLS 1.1, or TLS 1.2 protocol. (SSL 2.0 and SSL 3.0 protocols are not supported.) Follow the steps to configure the outgoing email settings in SharePoint 2016.

1. Open the SharePoint Central Administration and browse to System Settings > Configure outgoing e-mail settings.

2. In Outgoing E-Mail Settings page, configure the settings as followings:

Outbound SMTP server: SMTP server name

From address: your email address

Reply-to address: your email address

Use TLS connection encryption: Yes

SMTP server port: 587

3. Click OK button to save settings.

But unluckily, I cannot configure the outgoing email settings for Gmail SMTP server successfully. I will do more research, and introduce the how to figure it out later.

The post Outgoing Email Settings in SharePoint 2016 appeared first on BoostSolutions.

Viewing all 16 articles
Browse latest View live